The QuickMarks Manager stores every QuickMarks that has been created by you, and also stores any QuickMarks that other instructors have shared with your account. The Turnitin Feedback Studio provides QuickMarks sets ready for use. Each set contains a multitude of comments to assist you as you provide student feedback.
Access QuickMarks Manager
The QuickMarks Manager can be accessed from two areas within the Turnitin Feedback Studio:
- Side panel
- Click the QuickMarks icon from the online grading toolbar to open the QuickMarks side panel. This will show the currently active QuickMarks set.

- Click the cog icon from the QuickMarks side panel to open the QuickMarks Manager.

- Click the QuickMarks icon from the online grading toolbar to open the QuickMarks side panel. This will show the currently active QuickMarks set.
- Student Paper.
- Click anywhere on the paper to reveal the in-context marking tool and click the QuickMarks icon.

- Click the cog icon from the QuickMarks side panel to open the QuickMarks Manager.

- Click anywhere on the paper to reveal the in-context marking tool and click the QuickMarks icon.
Create new QuickMarks Set
You can create your own custom QuickMarks comments in the QuickMarks Manager. This allows you to use class- or curriculum-specific marks that may not be part of the sets provided by Turnitin or the account administrator.
Follow above steps to access QuickMarks Manager, then
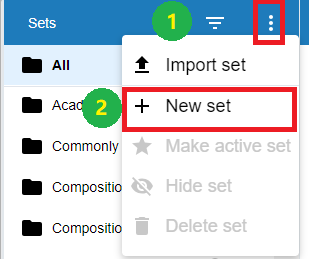
Step 1 : Select the More menu located to the right of the Sets column header.
Step 2 : Select + New set from the list of actions.

Step 3 : Enter a title for the new QuickMarks set then select the Submit.

Create new QuickMark
After opening the QuickMarks Manager,
Step 1 : Select the name of the set to add a new QuickMark to.
Step 2 : Select the plus + icon to the right of the QuickMarks header in the center panel.
Step 3 : Enter a title and a description into the fields provided. Formatting and hyperlinks are available for your QuickMark's description, too.
step 4 : Select Submit to save the new QuickMark into the selected set. Choose Cancel to go back without saving

Editing QuickMarks
QuickMarks can be edited from within the QuickMarks Manager. Any edits that are made to a QuickMarks are applied to every instance where this mark appears in your students’ papers.
Step 1: Select the QuickMark set containing the mark to edit,
Step 2 : Select the QuickMark you would like to edit.
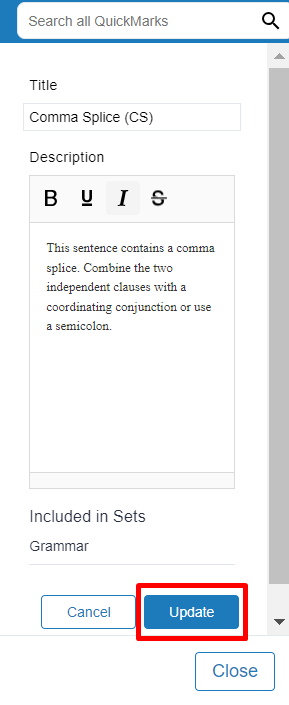
Step 3 : Select the pencil icon in the top right corner of the third panel to edit the QuickMark.

Step 4 : Once you are finished editing the mark, select the Update button to save. Choose Cancel to discard any changes.

Note: Lecturers may only edit QuickMark sets and marks that you have created. QuickMarks sets with a lock icon to the right of the set name cannot be modified, as they are provided by Turnitin or the account administrator.
Remove QuickMarks from a set
Step 1 : Select the name of a QuickMark set.
Step 2 : Select the mark to remove.
Step 3 : Within the mark details, click the minus – icon to the right of the set name you wish to remove this mark from.
Note: To select multiple marks, hold cmd (Mac) or ctrl (PC) while you make your selections. Or, to select all the marks in between two marks, select the highest mark in the list you want to remove and then hold shift and select the lowest mark in the list you want to remove. All marks in between will be highlighted.
Search for QuickMarks
Use the search function to find a specific QuickMarks quickly. The search bar is located at the top of the QuickMarks side panel and at the top of the rightmost panel of the QuickMark Manager.
Step 1 : In the search bar, enter the part of the QuickMarks title or description.
Step 2 : A list of all QuickMarks that match the search term you have used will appear in the search results. The list contains all the times the search term matches with the title or the description of a QuickMarks.

